


With the WP Automatic plugin, you can effortlessly automate everything from content updates to backups, saving valuable time and making sure your site runs smoothly without constant monitoring. So let’s jump right into how you can automate your entire WordPress website with WP Automatic.
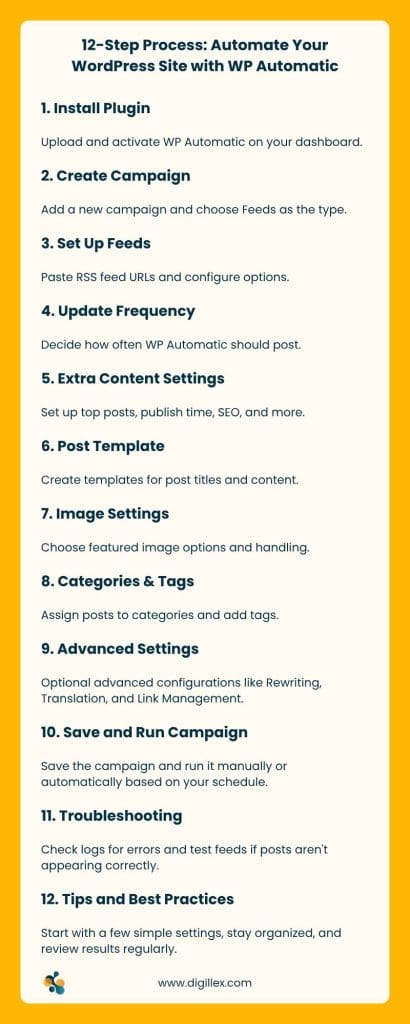
Step 1: Install the WP Automatic Plugin
The first step to automating your WordPress website is to install the WP Automatic plugin. Follow these simple steps:
- Login to WordPress Dashboard: Access your WordPress admin panel.
- Install the Plugin: Go to the Plugins menu > Add New > Click Upload Plugin.
- Upload the Plugin File: Select the WP Automatic plugin .zip file and click Install Now.
- Activate: After installation, click Activate.
Once activated, you’ll see WP Automatic listed on your sidebar, ready for use.
Step 2: Create Your First Campaign
WP Automatic allows you to set up campaigns for automating content. Here’s how:
- Go to WP Automatic: On the sidebar, click WP Automatic.
- Add a New Campaign: Click Add New Campaign.
- Name Your Campaign: In the “Campaign Title” field, give it a relevant name (e.g., “Tech Blog Posts” or “Entertainment News”).
- Choose Campaign Type: Select Feeds from the dropdown. This will pull content automatically from RSS feeds.
Step 3: Set Up Your Feeds
WP Automatic pulls content from RSS feeds. Follow these steps to add your desired feeds:
1. Add Feed URLs: In the Feeds to Post From box, paste the RSS feed URLs you want to pull posts from. Each URL should be on a separate line.
Example:
- http://example.com/feed
- http://anotherexample.com/feed
2. Feed Options:
- Rotate Feeds: Enable this if you want the plugin to rotate between your feeds.
- Randomize Feeds: Enable this if you want the plugin to choose a random feed each time.
Step 4: Set Update Frequency
Now, decide how often new content should be posted:
- Update Frequency: On the right side, find Update Frequency and set it to something like 60 minutes for automatic posts every hour.
Step 5: Customize Extra Content Settings
Customize how the posts appear:
- Top Posts: Select Only post the top/latest posts if you only want the most recent posts from the feed.
- Use Original Publish Time: Enable this to maintain the original publish time for posts.
- SEO Settings: Set default Tags and Categories to help with SEO. You can also add Meta Tags for better optimization.
- Skip Posts with No Content/Images: Check this box if you want to avoid posts without content or images.
Step 6: Configure Post Template Settings
This step allows you to set how your posts look:
- Post Title Template: Use tags like [post_title] to create dynamic post titles. Example: “Latest Tech Post: [post_title]”.
- Post Text Template: Customize how the post content appears. You can set up rewording options or use [gpt] to automatically generate content.
- Slug Template: For SEO-friendly URLs, use [post_title] in the slug field.
Step 7: Set Up Image Settings
Images are crucial for engagement. Here’s how to manage them:
- Featured Image: Select the option to set the first image from the feed as your post’s featured image.
- Strip First Image: Disable this if you want the first image from the feed to show within the post content as well.
- Image Handling: Choose whether WP Automatic should grab images automatically or if you want to manually upload them.
Step 8: Assign Categories and Tags
Organize your posts into categories and tags for better site navigation:
- Categories: Choose categories (e.g., Entertainment, Tech) where the posts should go.
- Tags: Add relevant tags like “Technology”, “Movies”, etc., to help with content discoverability.
Step 9: Optional Advanced Settings
For further customization, WP Automatic offers advanced features:
- Rewriting/Translation: Enable these if you want content translation or post spinning.
- Content Search/Replace: Set rules to replace or modify specific words/phrases.
- Link Management: Manage external and internal links with ease.
Step 10: Save and Run Your Campaign
Once you’ve configured everything, it’s time to activate your campaign:
- Save Campaign: Click Publish (for new campaigns) or Update (for existing ones).
- Run Campaign: You can manually run your campaign by clicking Run Campaign, or let it run automatically based on the schedule you set.
Troubleshooting
If your posts aren’t showing up as expected:
- Check Logs: Go to the Logs section under WP Automatic settings to identify errors.
- Test Feeds: Ensure the RSS feeds are working correctly. Some might only offer summaries instead of full content.
Tips & Best Practices
👇 Some helpful tips to make sure everything goes smooth…
Start Simple. Begin with a few feeds and basic settings, then fine-tune them as you gain experience. Stay Organized. Name your campaigns clearly to manage them easily. Review Regularly. Check logs and results to make sure everything runs smoothly.
Outro
Automating your WordPress website with WP Automatic can save you time, improve content delivery, and ensure your site is always fresh. From RSS feed-based content automation to advanced image management and SEO settings, WP Automatic offers everything you need to automate essential aspects of your site. Follow this step-by-step guide, and you’ll have a fully automated WordPress website running in no time! And keep visiting Digillex for more!